2.5 Unity Practices to Avoid

Use as you see fit

Unity encourages certain practices that lead to building applications quickly. When talking about best architectural practices, it’s important to understand the tradeoffs of the practices and paradigms you use.

This chapter discusses “bad” practices that can hinder the progress of bigger or more complicated projects, but might be completely suitable for your use case or if you’re building a prototype or demo.

However, in many cases, following certain practices and not others can incredibly benefit the growth and progress of your project. It’s impossible to talk about every single case, so I’ll just go over the common practices that I’ve seen professional developers avoid.

1. Avoid basing your architecture on UnityEvents and other forms of inspector logic

UnityEvents are a type of events that you can use to invoke callbacks through the inspector.

For example, let’s say we have a MonoBehaviour called Door. When the door is opened, it invokes a UnityEvent called OnDoorOpened.

public UnityEvent OnDoorOpened;

Now we can head to the inspector and add a callback to LevelController.GoToNextLevel()

There are many reasons why it’s a good idea to avoid this, especially when you use it to wire primary logic for your system.

Why should you avoid this?

Introduces anti-patterns

In a big system with a lot of moving parts, you probably want to maintain an architecture where there are outer layers managing your inner layers. The ability to add references to any MonoBehaviour or component in the scene and select a public method as a callback completely goes against this idea. When things don’t happen due to chains of cause and effect, the smaller features of your code can simply desync. How can you trust that you can disable or reset your feature if months later you forget and let an unrelated feature go as far as deactivate the entire object?

Hard to track

Let’s expand on the previous example and make it nightmare fuel: you work in a team of 10 developers (or in my case, your memory lasts a maximum of 7 days and you come back to a scene you haven’t touched in 3 months)…and an object just deactivates for unknown reasons. You think — no worries, it’s probably a UnityEvent somewhere in the scene. You look at the scene and…there are over 400 objects.

Now, I’m sure there are packages for tracking UnityEvents…but…are you really going to track gameObject.SetActive(..)?

Just an idea for your next Halloween costume.

Hard to debug

Here’s another nightmare scenario: you have no idea why a method is being called. You search for all of the instances where it was referenced, and you find it. But that method is invoked through a UnityEvent. You check that UnityEvent, and after a few minutes of digging, you find out it was being invoked by another UnityEvent.

Good luck git blaming that on someone.

Breaks logic without errors

If your code changes and removes GoToNextLevel(), it’ll simply break your behaviour without compile errors.

If you’re working with other people, your code will now require a lot more care in order to not cause issues like this.

Unnecessary inspector setup for consistently repeating logic

Say you want to go to the next level every time the door is opened. Why should that require an inspector setup every time? Inspector setups should be reserved for asset references and situations where it’s actually helpful to have that as an option.

Scene changes and editor setups

If every level is in its own scene, now you have to set this callback in every occurrence of the event. If it breaks, you’ll have to go around changing it everywhere. That’s exactly the kind of things we want to avoid.

Changing this will also register as a scene change, which is also something you want to reduce if you’re using source control.

When should you use this?

Triggering callbacks from the inspector is not always a bad thing. But it should be best reserved for when it’s needed.

For example, animation events are a very useful case to use it.

However, from personal experience, they get increasingly hard to debug the more responsibilities you give them. So it’s a good idea to use them as a way of informing your systems of these events, and not for controlling the flow of the game for example.

/* Bad example: camera animation starts the level*/

public void StartLevel()
{
	player.EnableControls();
	ui.EnableHud();
	// other logic
}

If you’re working in a team, tracking inspector events like this example could unnecessarily hinder the workflow. Especially if this gets called from a process or a package that your fellow developers are not familiar with. So best avoid triggering inspector events from third-party or animation packages, or make sure you document every instance.

/*Good example: the method is unique and it's clear from the name that it's a handler.
 A comment is present to make things clear.*/

// Handler for when the intro camera animation is over, triggered by [Used Camera System]
public void HandleCameraAnimationOver()
{
	StartLevel();
}

Alternative: use C# Actions

The alternative in this case is clear. C# actions allow you to subscribe to callbacks and invoke them without involving the inspector.

//..Door.cs
public event Action OnDoorOpened;

//..LevelController
door.OnDoorOpened += HandleDoorOpened;

2. Avoid having singletons in your inner layers

The singleton design pattern allows you to have a globally accessible static object that maintains the reference to your object to be accessed from anywhere when needed.

We won’t discuss the implementation of singletons here, but say if we made our LevelController a singleton, and in this implementation the instance is a static property called Instance, we can access it from any script like this:

LevelController.Instance

There’s a lot of debate over singletons in Unity development, but one thing becomes very clear when you work on enough code bases: they’re extremely common.

They can be useful if used responsibly, but it’s common to abuse them by introducing them at every layer.

I keep referring to the chapter on The Dependency Rule because it’s essential in making any large code base manageable. But the basic idea is that you want to have a hierarchy in each one of your systems where an outer layer would manage the nearest inner layer, and so on.
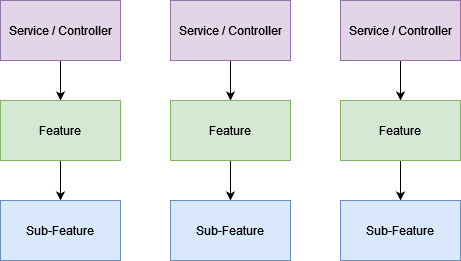
A common mistake here is to convert some of your classes that live in the inner layers to be singletons in order to access their references, or to not care about layering in the first place.
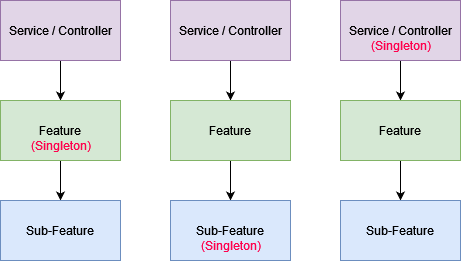
Why should you avoid this?

Introduces coupling

If your features from system A,B,C, and D knows about your feature from system E, then making small changes to your feature under system E might mean you have to make changes to the other systems as well. While this is inevitable in a large code base, it’s much more manageable to keep things separated.

Increases the number of singletons in your code

Without any real logic to what needs to be a singleton and what doesn’t, you’ll end up with a lot of singletons in your code.

Bypasses lifecycle

If you introduce feature B that’s affected by feature A, then it’s much more manageable to execute logic from feature A through an outer layer that controls its lifecycle.

Alternative: have top layers as singletons

You can think of the top layers as a service in this instance. Other features can call this service to perform an action without worrying about the specifics of this underlying logic.
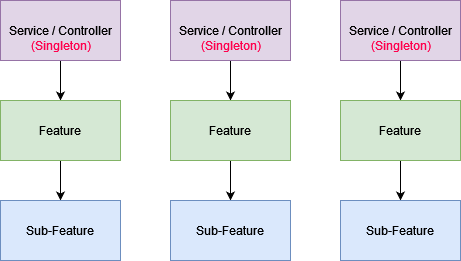
For example

If you have a top layer service/manager that manages saving and loading player progress for example, you can always save your progress by calling this service.

yield return GameSaveService.SaveGameRoutine();

Say at first, this data was XML, then JSON, then finally it changed to save this data by sending a request to a server. Your other features that interact with this service won’t need to change or know anything about these details. They make a big picture request to this service, and your top layer figures out the small picture details.

3. Avoid controlling your feature lifecycles by enabling/disabling them through Unity

It’s a clear theme here that reducing inspector dependency and setup is a big part of making your code scalable.

One common method of managing your lifecycle in Unity is enabling MonoBehaviours or game objects when they’re needed, and disabling them when they aren’t.

Let’s say we have a GoalTracker that tracks a Goal in your game when one is assigned through an event.

// GoalTracker.cs

private void Awake()
{
	Goal.OnAnyGoalActive += HandleGoalActive;
	gameObject.SetActive(false);
}

private void HandleGoalActive(Goal goal)
{
	this.goal = goal;
	gameObject.SetActive(true);
}

private void Update()
{
	if(goal.IsActive)
	{
		if(CheckGoalCondition())
		{
			goal.Success();
			goal = null;
			gameObject.SetActive(false);
		}
	}
}

Why should you avoid this?

Simply, this adds extra tax to managing your features. Because now you have to remember which features are enabled/disabled in the hierarchy.

Disabling and enabling features also opens the door for issues related to parenting. If a parent is inactive in the hierarchy, the child game objects will be inactive, and their scripts will be disabled. This is the sort of thing that becomes very easy to overlook once your project increases in complexity.

Plus, it’d be harder to track why a feature is disabled if you can search for its references, in this case we really can’t trace why GoalTracker was set to inactive by looking for its mentions in the code as easily.

Alternative 1: Separate your state handling from Unity’s lifecycle

I personally like to keep my Unity lifecycle methods empty for control, with my own lifecycle managed in well-packaged methods.

private void Update()
{
	if(IsTracking)
	{
		UpdateTracking();
	}
}

Alternative 2: Have a parent in the architecture update your feature

You can also cut the Unity Update() method in this case, and have the lifecycle updated through an outer layer

//GoalManager.cs

private void Awake()
{
	goalTracker.OnGoalFinished += HandleGoalFinished;
}

private void HandleGoalFinished()
{
	SetState(State.NotTracking);
}

private void AssignGoal(Goal goal)
{
	goalTracker.SetGoal(goal);
	SetState(State.TrackingGoal);
}

private void Update()
{
	if(state == State.TrackingGoal)
	{
		goalTracker.Tick();
	}
}

Loading

PHP Code Snippets Powered By : XYZScripts.com